When we paint or repaint our walls, we do it for a number of reasons. Not only do we do it to make the walls look nice, but we also do it to provide a protective coating on the walls, fix any cracks that may appear, and protect it from wear and tear.
Did you know that stripping and sealing a vinyl floor works on a similar principle?
Just as nothing is permanent in this world, the sheen and glow of your vinyl flooring is sure to fade away after some time.
That’s when you may start wondering if there is a way for your floor to regain the same shiny look when it was new.
Is your workplace vinyl flooring looking dull and has lost its nice sheen? If so, maybe it’s time to have a strip and seal done.
But what is a strip and seal? How does the process work?
At In-Tec, we have guided many clients through the strip and seal procedure and why it’s beneficial to do this at least once a year. In this article, we’re going to take a look at the following:
- What is a strip and seal?
- What is the entire step-by-step process?
- Why do you need a strip and seal done on a regular basis?
What is a strip and seal and what does it achieve?
First things first, we need to answer probably the most fundamental question you have regarding a strip and seal for your workplace floor.
And that is, “What is it?”
After all, you need to know what the item is first before you figure out how it works and decide whether you need one for yourself.
When you get a brand-new vinyl floor fitted, it always looks shiny and polished (or at least it should do). I mean, that’s the whole point of a new floor. But overtime, the sealant on the floor can lose its lustre due to constant foot traffic, scratches, and general wear. This is where a strip and seal comes in.
A strip and seal is the process of stripping off the old sealer, neutralising the floor (with a solution containing a PH neutralising additive), and then replacing the sealer with new coats. Strip and seals are done on vinyl, lino, tile, and marble flooring, however at In-Tec, we primarily strip and seal vinyl floors for our clients.
How can you tell when the sealer is old and needs re-sealing?
It’s the mirror finish on a floor vs a dull, matte finish that is the giveaway. Or maybe the floor just looks dirty - a sign that the old sealer is what we call hanging onto the dirt.
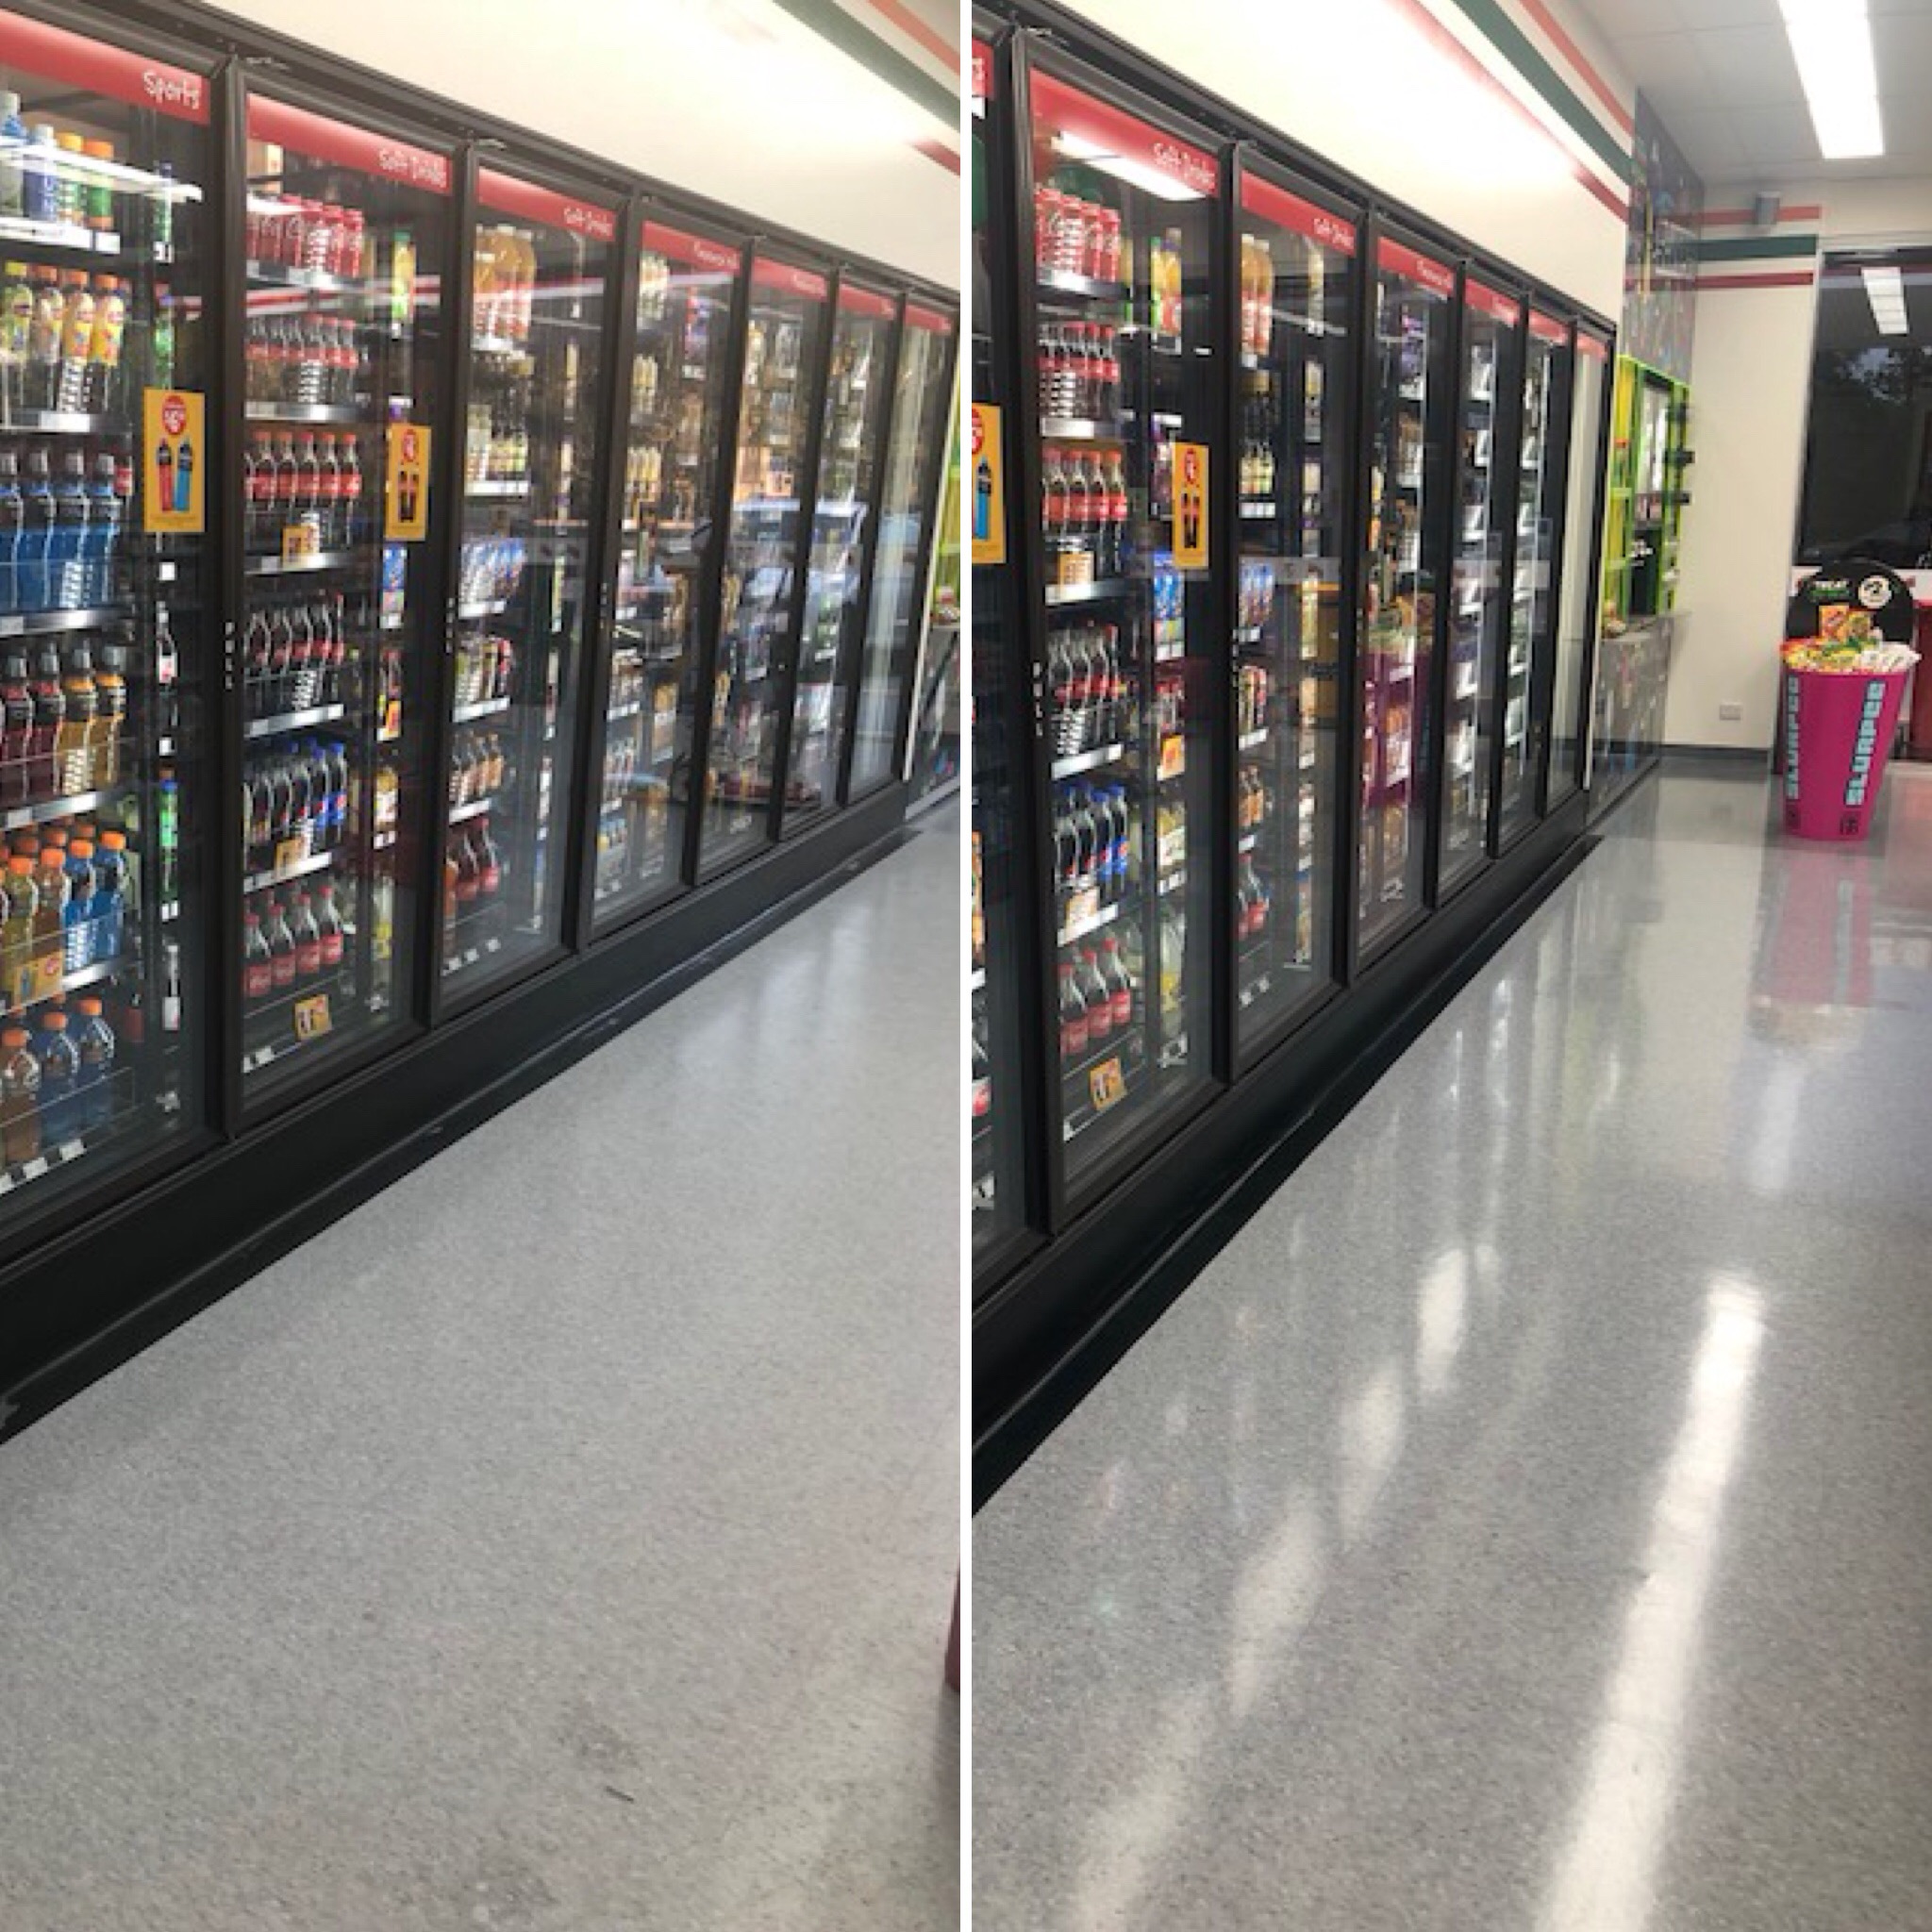
If you were to walk into a premise that has had a strip and seal done vs one that hasn’t, you would instantly be able to see the difference. Just take a look at the main photo above!
Does your current floor look like the before photo?
To put it in simpler terms, stripping and sealing is how you turn old and dull sealed floors into new-looking, shiny sealed floors. Of course the floor will also look clean!
It sounds like a good periodical to have done on a regular basis right?
How does a strip and seal work? [7-step process]
Before you know it, we’re onto the next question in our process.
How does the team at In-Tec Commercial Cleaning strip and seal vinyl floors?
In this section, we are going to go through the entire process from start to finish so you know exactly what a strip and seal entails.
We do get a little technical in some parts so please bear with us – we will endeavour to make it as easy as possible to read and understand.
1. Do a risk assessment
Before our cleaners conduct any major tasks, the first thing they do is conduct a risk assessment of the building. This can include making sure where all the exits, fire extinguishers, power supply, water supply, bathrooms, etc., are in the building.
In other words, they’re doing all the important behind the scenes stuff to get them prepared for the job.
During this process, a cleaner is also clearing the area. This involves moving any obstacles that may get in the way such as tables, chairs, bins, etc.
You may also be asking why do the cleaners need to familiarise themselves with the site? Are they different team members from my normal cleaners?
The short answer is yes. The team members we use to complete stripping and sealing of vinyl floors are different from your regular cleaners who come in every week. This is because the team members we use to conduct strip and seals are specifically trained to do this task - they are best to perform this work.
2. Pre-vacuum the floor
When conducting any type of cleaning procedure on any floor type, the cleaner should always pre-vacuum the floor to remove any surface dirt, dust, or residue that is lying around. They are also removing any visible marks, stickers, blu tack, or gum off the floor.
Basically, anything that’s either loose or stuck to the floor is taken care of to achieve optimal results later in the process.
3. Use floor stripper to mop the floor
So far, the cleaners have done some prep work in order to get the site ready before the strip and seal is laid down.
But now is where the magic begins!
The first step of the stripping action is diluting a floor stripper chemical (we use Pioneer Eclipse products) with water to the correct ratio which is done in a 15-litre mop bucket.
Key takeaway point: stripper must always be diluted with cold water as hot water deactivates it.
Then, the cleaners heavily saturate a clean microfibre mop in the solution – you don’t ring the mop out. This allows the cleaner to flood the floor with the stripper ensuring that the entire floor has been evenly covered.
How long does the stripper solution get left on the floor?
Honestly, it really just depends. But a big influence is the number of coats of sealer that were on the floor previously. Some floors may have 1 or 2 coats of sealer which means the sealer will come off quite quickly. Whereas 3, 4, 5, or more coats will take longer to remove.
However, the general sit time can be anywhere between 10-20 minutes. During this period, the cleaner mustn’t let the stripper dry on the floor!
4. Use the commercial swing machine
Firstly I suppose we should explain what a swing machine is. You may have seen one being used by a character in a movie or a TV show. Anyway, it is a machine that can be used to polish floors and in this case to agitate the stripper.
After the cleaners have laid down (applied) the stripper, they need to agitate the solution to effectively loosen the sealer.
This is done via a swing machine or rotary scrubber. At In-Tec, we use a Polivac machine.
As the swing machine sways left to right, it is scrubbing the chemical (stripper) with a circular pad that spins – a highly aggressive black or emerald pad is used (don't worry - if correctly used, it removes the sealer but doesn't damage the floor surface).
Again, it’s critical that the stripper doesn’t dry in the time you have scrubbed. So a good commercial cleaner will only do enough area that they can effectively clean.
Because the machine is quite large, it can be difficult to scrub the hard to reach areas – this is where a steel wool or doodlebug (rectangle pad at the end of a pole) comes into play. While the cleaner is using the polivac, they’re also cleaning up any edges or bits around furniture with either handheld scrubber.
5. Wet and dry vacuum the floor
If you think we’re almost to the end, think again!
Our cleaners still have 3 important tasks they need to perform before the floor looks new and shiny.
Once the cleaners have scrubbed the sealer off, they go over it with a wet and dry vacuum. This sucks up all the residue that has now been scrubbed off – that is the mixture of stripper and sealer. This must be vacuumed before the floor becomes dry otherwise the cleaner would have to re-start the whole process.
From the outside, stripping and sealing may not seem to be a difficult task. However, as you can see, the cleaner always needs to be vigilant when it comes to keeping the floor wet at all times – never dry.
6. Mop the floor with clean water - twice.
Cleaners will always follow the wet and dry vacuum step with hot water and a mop to remove any extra residue that may be lying around. As soon as the floor has dried from the first mop, it is then mopped a second time - however with cold water and the neutraliser added.
This is done with a clean microfibre mop as we need to ensure that we have neutralised the floor – gets the floor ready to be sealed.
Mopping the floor also allows the cleaner to do a defect check to see if any spots on the floor may have been missed, or whether any extra hard sections need to be re-stripped again.
You may be wondering why the floor needs to be neutralised?
To not be too technical, the stripper solution is about 13 on the PH scale (highly alkaline) and the floor surface needs to be neutral to ensure good adhesion of the new sealer to the floor surface.
7. Apply the sealer
We have made it.
The final step that will make your floor look as good as new. Let’s see how a cleaner does just that.
After the last mopping of the floor has dried, it’s time for our cleaners to apply the sealer via an applicator, which is essentially like a really big flat mop. The cleaner soaks the mop in the sealer coat and lays down lines of sealer onto the floor. As the sealer is spread, it’s filling into all the voids.
Again, the cleaner must make sure the sealer does not dry (keeping a wet edge). In other words it’s just like painting a wall - do not let the edges dry as you are working along the wall.
A good cleaner will work their way out so that by the time they have done a specific section, they are off the floor. This is so they aren’t stepping on freshly sealed flooring.
Did you know that 4 coats of sealer should be applied for a standard floor?
At In-Tec, we always want to ensure we go for the best finish possible which is why 4 coats are applied. If 4 coats aren’t enough, we would go back and do another.
It’s been said that patience is a virtue when applying floor finish.
In between each coat, the sealer must be left to dry. In our experience, it can take anywhere between 15-45 minutes depending on the humidity and heat within the building. While each coat dries, all you can do is sit down and wait. Generally, the first coat dries the quickest as it’s going on a raw floor which sucks in the sealer a lot quicker.
Why does the cleaner need to wait in between each coat?
In a nutshell, if the floor is not completely dry, the other coats of sealer will soften the previous coat which can lead to the floor looking patchy afterward – some shiny areas and some dull areas.
So the moral of the story is, a good cleaner should not rush through applying each coat of sealer.
Finally, after all the coats of sealer have completely dried, the floor should be left for a minimum of 1-2 hours before any furniture is put back and/or people walk on it. Ideally though, the longer the better. This is why the team at In-Tec tend to perform strip and seals after hours or on the weekends which gives the floor plenty of time to dry in time for the next working day.
And there you have it, a complete run down, head to toe, of how a strip and seal works.
Why you need a strip and seal done on a regular basis
Throughout the blog, we’ve gone through an in-depth definition of what a strip and seal is, and a detailed process of how it works.
But what does this matter to you?
You’re probably wondering why you even need to get one in the first place. Obviously we’ve spoken about the one key reason why a strip and seal is beneficial, and that’s lustre.
But are there any other reasons that come to mind?
Well there are certainly many reasons why a strip and seal should be done on floors regularly so let’s go through them.
- The new seal will add more sheen
- Your floors will last longer – you won’t need to replace them as much
- Reduces the risks of scratches and marks
- Provides a barrier against germs and abrasion
- Makes the floor much more robust
- Your floor surfaces will look clean and be easier to clean
Would you rather have a dull and dirty looking floor?
Or a sealed, shiny, mirror finish look on your floor?
It seems to me that one appears like a better option than the other (Hint: it’s the second one!)
Plus, you don’t want to neglect having a strip and seal done regularly as in the long run, it can be an expensive mistake.
Is a strip and seal the right option for my flooring?
Take a look at the vinyl floors in your workplace right now.
Do they seem dull? Different from how they were when you first started working there? Are there scuff marks that you’re certain weren’t there before?
If you’re nodding your head to these questions, then you’re in need of a strip and seal.
A strip and seal will bring your floors back to life.
At In-Tec, we recommend having them done yearly (if not more) and including them in your scope of works. Then, you’ll have an exact idea of when they’ll be done and you won’t have to stress about scheduling it in.
Our team of professional cleaners are highly trained in performing strip and seals. We use quality equipment and chemicals to get the job done properly.
If you require a strip and seal, or you’d like to talk with us more about the whole process, schedule a call with Paul or Caitlin. We’re here to help.
